How to Build a Todo List App With Javascript and Local Storage
Howdy Folks, Welcome to this new tutorial. In this tutorial, you will learn how to create a simple Todo List App using HTML, CSS, and Javascript.
This tutorial was initially published in my blog, if you are interested to see more tutorials like this then check out this link — https://thecodingpie.com/
Before jumping right in first, take a look at the finished product here at Codepen → Todo List Codepen
You can download the completed project from GitHub → Todo List App Github
Prerequisites
I assume that you had a decent understanding of HTML, CSS, and Javascript. I am not going to explain CSS, instead, you can just copy the code for the CSS file. We are going to focus on HTML and mainly Javascript. You should also have a knowledge of forEach loop, filter function, == and ===, Conditional (ternary) operator, functions, template literals, and Javascript Object.
But anyway feel free to follow along, I will try my best to keep this tutorial simple.
I am going to use visual studio code as my text editor. You are free to use whatever code editor you like. And finally, make sure you have installed Live Server by Ritwick Dey in visual studio code. If you don’t have Live Server installed, then:
- Open visual studio code
- Goto Extensions tab (Ctrl + Shift + X)
- Search for “Live Server” by Ritwick Dey
- Then Install it
But wait, How we are going to build this thing?
Breaking Down the Logic
Logic is quite simple. Our Todo List can do the following:
- Add a new todo item.
- Strikeout the todo item if it is completed.
- Delete the todo item.
- Then always save the todo items permanently on LocalStorage.
That’s what we all want to do and trust me it’s quite simple 😀. Now let’s get started…
Initial Setups
Create a folder structure similar to below:
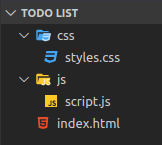
- First, create the root folder which holds everything and name it as “
Todo List” - Then open this folder in visual studio code.
- Then directly inside this root folder, create a file named “index.html” → This will hold our HTML.
- Then again directly inside our root folder, create two folders:
- One named “
css” → Inside this folder, create a file named “styles.css”. - Then another folder named “
js” → Inside this folder, create a file named “script.js”.
That’s it. Now you should have a folder structure similar to above. Now the HTML part…
HTML
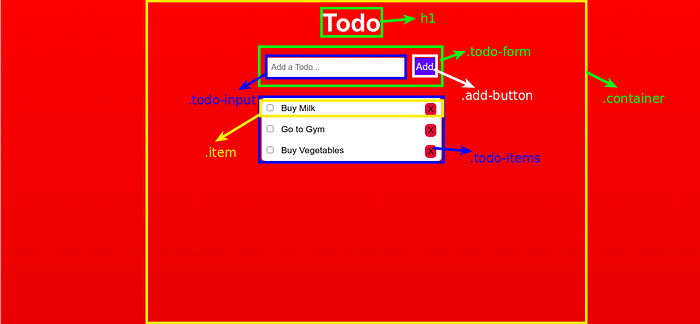
Open “index.html” and type the following:
<!DOCTYPE html>
<html lang="en">
<head>
  <meta charset="UTF-8">
  <meta name="viewport" content="width=device-width, initial-scale=1.0">
  <link rel="stylesheet" type="text/css" href="css/styles.css">
  <title>Todo List</title>
</head>
<body><div class="container">
    <h1>Todo</h1><form class="todo-form">
      <input type="text" class="todo-input" placeholder="Add a Todo...">
      <button type="submit" class="add-button">Add</button>
    </form><ul class="todo-items">
      <!-- dummy item -->
      <li class="item" data-key="1594003133171">
        <input class="checkbox" type="checkbox">
        Go to Gym
        <button class="delete-button">X</button>
      </li>
    </ul>
  </div>

  <script type="text/javascript" src="js/script.js"></script>
</body>
</html>
Our HTML is quite simple.
- Inside our
<body></body>, we have a.container. Inside that, we have a<h1>which says “Todo”. - Then below that, we have a
<form>withclass=”todo-form”. - Inside the
<form>, we have an<input>box oftype=”text”withclass=”todo-input”. - Then we have a
<button>oftype=”submit”andclass=”add-button”. - Then below the
<form>, we have an<ul>withclass=”todo-items”. This is going to hold all our todo items. - Inside
.todo-items, we have a dummy.itemfor now. Each todo.itemshould look like the following:

Each .item has a data-key attribute which serves as an id to distinguish it. The value of data-key is a Date object.
- Then inside each
.item, we have an<input>box oftype=”checkbox”andclass=”checkbox”. - Then the actual todo text.
- Finally a
.delete-button.

Now Open it with Live Server by right-clicking on the “index.html” file (inside visual studio code), then scroll down and click on the “Open with Live Server” option and take a look at it at the browser. You can’t see any styling now. Because we only linked the “styles.css” file but didn’t write any CSS styles. So now let’s do that. Let’s add some styles…
CSS
Open the “styles.css” file you created and copy the following:
/* common styles */
* {
  padding: 0;
  margin: 0;
}body {
  width: 100vw;
  min-height: 100vh;
  display: flex;
  justify-content: center;
  background: linear-gradient(#F00000, #DC281E);
  font-family: sans-serif;
}button:hover {
  cursor: pointer;
  background-color: #73E831;
}ul {
  list-style-type: none; /* get rid of bullet points on side of list items */
}/* common style ends *//* container */
.container {
  min-width: 700px;
  display: flex;
  flex-direction: column;
  align-items: center;
  padding: 20px;
}h1 {
  color: #fff;
  font-size: 3rem;
}/* todo-form */.todo-form {
  margin: 40px 0px;
}.todo-input {
  width: 250px;
  border: none;
  outline: none;
  border-radius: 5px;
  padding: 10px;
  margin-right: 10px;
  font-size: 1rem;
}.add-button {
  background-color: #0000ff;
  color: #fff;
  border: none;
  outline: none;
  border-radius: 5px;
  padding: 7px;
  font-size: 1.2rem;
}/* todo-form style ends *//* todo-items */
.todo-items {
  min-width: 350px;
}/* each li with class="item" */
.item {
  background-color: #fff;
  padding: 10px;
  font-size: 1.1rem;
}.item:first-child {
  border-top-left-radius: 7px;
  border-top-right-radius: 7px;
}.item:last-child {
  border-bottom-left-radius: 7px;
  border-bottom-right-radius: 7px;
}/* item style end */.checkbox {
  margin-right: 10px;
}.delete-button {
  float: right;
  background-color: #dc143c;
  border: none;
  outline: none;
  border-radius: 7px;
  padding: 2px 5px;
  margin-left: 10px;
  font-size: 1.1rem;
  font-weight: 550;
}/* applied when the todo item is checked */
.checked {
  text-decoration: line-through;
}/* todo-items style ends *//* container style ends */
CSS is not our main focus here. So I am not going to explain it.
Now if you take a look at the browser, you should see the page with the styles applied.
Wait but our todo list app is not working, right? That’s what we are going to do next.
Javascript
From here on I will be doing everything bit by bit so that you can get a better understanding of what we are doing…
We have several things to do. So I am going to wrap each functionality into its own function. At the end you will have the following functions:
addTodo(item)renderTodos(todos)addToLocalStorage(todos)getFromLocalStorage()toggle(id)deleteTodo(id)
Now let’s start coding all the things we need to make our todo list working.
The first thing we need is to get a reference for everything we need from the DOM.
Open the “script.js” file and type the following:
// select everything
// select the todo-form
const todoForm = document.querySelector('.todo-form');
// select the input box
const todoInput = document.querySelector('.todo-input');
// select the <ul> with class="todo-items"
const todoItemsList = document.querySelector('.todo-items');
This will grab .todo-form, .todo-input, .todo-items from the DOM and stores them in corresponding constants.
Now below that make an array like this:
// array which stores every todos
let todos = [];
This array is going to hold all our todo items. Each item is going to be a Javascript Object like below:
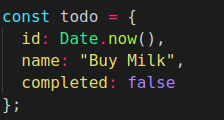
item objectIt has an id, name, and a completed status.
The next thing we need to do is, whenever the user types a new todo into the <input> box, we need to take that value and make an object similar to above and push it into the todos array.
So to do that, below the todos array type the following:
// add an eventListener on form, and listen for submit event
todoForm.addEventListener('submit', function(event) {
  // prevent the page from reloading when submitting the form
  event.preventDefault();
  addTodo(todoInput.value); // call addTodo function with input box current value
});
The above code will listen to a submit event on the form. Whenever that happens, the default behavior of the javascript is to reload the page. So to stop that from happening we call event.preventDefault().
Then pass the value the user typed to addTodo() function. We can get the value the user typed from todoInput.value. Remember todoInput is the actual input box.
addTodo() function
Now create the addTodo() function below the above code:
// function to add todo
function addTodo(item) {
  // if item is not empty
  if (item !== '') {
    // make a todo object, which has id, name, and completed properties
    const todo = {
      id: Date.now(),
      name: item,
      completed: false
    };// then add it to todos array
    todos.push(todo);
    renderTodos(todos); // then renders them between <ul>// finally clear the input box value
    todoInput.value = '';
  }
}
This addTodo() function will take an item as its first argument. Then:
- It will check if the item is empty or not. If it is not empty then:
- construct a new
todoobject as we discussed earlier. This object should have anid,name, andcompletedproperty. - Then it pushes that object into our
todosarray. - Then calls the
renderTodos()function. This function is responsible for rendering each item to the screen. - Finally, it will clear the
inputbox.
renderTodos()
Now let’s create the renderTodos() function below addTodo() function:
// function to render given todos to screen
function renderTodos(todos) {
  // clear everything inside <ul> with class=todo-items
  todoItemsList.innerHTML = '';// run through each item inside todos
  todos.forEach(function(item) {
    // check if the item is completed
    const checked = item.completed ? 'checked': null;// make a <li> element and fill it
    // <li> </li>
    const li = document.createElement('li');
    // <li class="item"> </li>
    li.setAttribute('class', 'item');
    // <li class="item" data-key="20200708"> </li>
    li.setAttribute('data-key', item.id);
    /* <li class="item" data-key="20200708">
          <input type="checkbox" class="checkbox">
          Go to Gym
          <button class="delete-button">X</button>
        </li> */
    // if item is completed, then add a class to <li> called 'checked', which will add line-through style
    if (item.completed === true) {
      li.classList.add('checked');
    }li.innerHTML = `
      <input type="checkbox" class="checkbox" ${checked}>
      ${item.name}
      <button class="delete-button">X</button>
    `;
    // finally add the <li> to the <ul>
    todoItemsList.append(li);
  });}
Now the explanation:
- This function, first of all, clears everything inside the
.todo-items— which is our<ul>which holds all our todo items. - Next, it will loop through each
itemobject insidetodosarray which we get as an argument. And for eachitem, it will create a<li>similar to below:

But the values of data-key and the actual text will get replaced by the corresponding item value.
- Finally, we are appending the
<li>(we created) to the.todo-items<ul>. - The two other things we are doing in the above code are:
checkedconstant which holds a value of‘checked’ornull. This value will depend on the completed status of each item. This value will be given inside the<input class=”checkbox” type=”checkbox”>. If we give‘checked’like below:

Then the tick will be shown inside the .checkbox. If nothing or null is given, then the .checkbox will be unchecked.
Then somewhere around the middle inside the function, we are doing this:

This line is responsible for adding a class .checked to the<li>. This class adds a strikethrough above our actual todo text. This again depends on the completed status of each item.
At this point, you can remove/comment-out the dummy item which we first typed manually inside the “index.html” file. And then take a look at the browser. Try to add some todo items.
Now we can add items to our todo list app. But when we refresh the page, all items would have gone.
So we need to persist them by storing them in the browser’s local storage.
addToLocalStorage() & getFromLocalStorage()
If you don’t know about local storage, then read this → https://developer.mozilla.org/en-US/docs/Web/API/Window/localStorage
You can view the local storage of your browser like below:
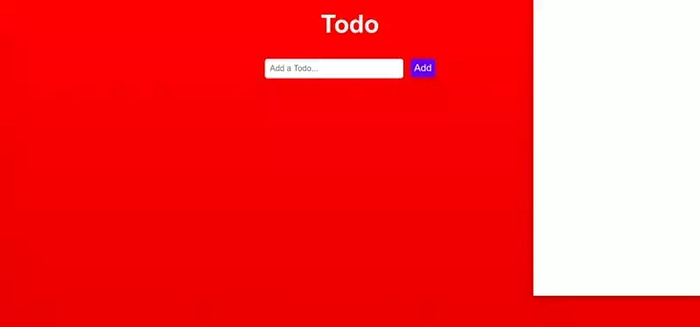
Let’s add the local storage capability. Type the following code below the above code:
// function to add todos to local storage
function addToLocalStorage(todos) {
  // conver the array to string then store it.
  localStorage.setItem('todos', JSON.stringify(todos));
  // render them to screen
  renderTodos(todos);
}
We can store items on thelocalStorage using setItem(). But We need a key and a value.
We are going to name our key as ‘todos’, and the value is going to be our todos array itself. But we can’t store an array inside localStorage 😔. We have to convert it to a string. That’s what we are doing using JSON.stringify().
Finally, we are calling the renderTodos(). Whenever we add something to the localStorage, we have to render that changes to the screen. That’s why we are adding renderTodos() function at the end.
Now replace the renderTodos() inside the addTodo() function with addToLocalStorage() like below:
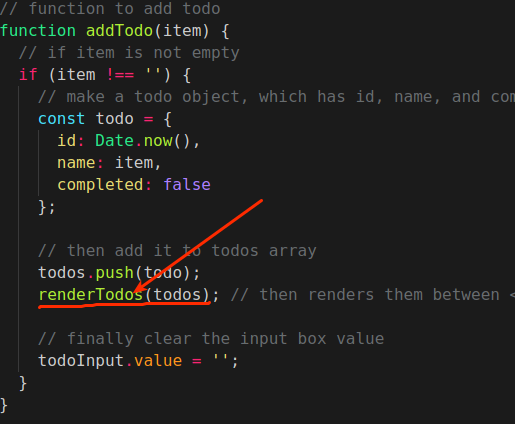
renderTodos() with…
addToLocalStorage() function callBecause we need to update our localStorage whenever the user inserts some new todo items.
Now if you take a look at the localStorage, you will see the items getting stored there. That’s cool 😀.
But still, they are vanishing from the screen when we refresh our screen.
To solve that, make a function called getFromLocalStorage() below the previous code, then call it.
// function helps to get everything from local storage
function getFromLocalStorage() {
  const reference = localStorage.getItem('todos');
  // if reference exists
  if (reference) {
    // converts back to array and store it in todos array
    todos = JSON.parse(reference);
    renderTodos(todos);
  }
}// initially get everything from localStorage
getFromLocalStorage();
This function will help us to parse all the items from localStorage whenever we load our web page. The JSON.parse() used here is to convert the stringified array back into a real array. The rest is self-explanatory.
Hooray, we are almost done! The other two features to add are the check and delete functionalities.
toggle() & deleteTodo()
Type the following below the getFromLocalStorage()
// after that addEventListener <ul> with class=todoItems. Because we need to listen for click event in all delete-button and checkbox
todoItemsList.addEventListener('click', function(event) {
  // check if the event is on checkbox
  if (event.target.type === 'checkbox') {
    // toggle the state
    toggle(event.target.parentElement.getAttribute('data-key'));
  }// check if that is a delete-button
  if (event.target.classList.contains('delete-button')) {
    // get id from data-key attribute's value of parent <li> where the delete-button is present
    deleteTodo(event.target.parentElement.getAttribute('data-key'));
  }
});
Make sure you have added the above code below getFromLocalStorage() function call.
Here, we are listening to the ‘click’ event on the whole <ul> itself. So we need to find out where the user had clicked, whether is it on the .checkbox, the whole <li>, or on the .delete-button. That’s what we are doing inside the function.
- If the user clicked on the
.checkbox, then calltoggle()function by passing theid. - If the user clicked on the
.delete-button, then calldeleteTodo()function by passing theid.
We can get the id from the data-key property of the <li>. That’s what we are doing inside each function call. (Remember, event.target is the element itself where the event happened).
Now let’s create the toggle() and thedeleteTodo() function. Type the following code above the getFromLocalStorage() function call.
// toggle the value to completed and not completed
function toggle(id) {
  todos.forEach(function(item) {
    // use == not ===, because here types are different. One is number and other is string
    if (item.id == id) {
      // toggle the value
      item.completed = !item.completed;
    }
  });addToLocalStorage(todos);
}// deletes a todo from todos array, then updates localstorage and renders updated list to screen
function deleteTodo(id) {
  // filters out the <li> with the id and updates the todos array
  todos = todos.filter(function(item) {
    // use != not !==, because here types are different. One is number and other is string
    return item.id != id;
  });// update the localStorage
  addToLocalStorage(todos);
}
For this, I am not going to explain. Rather I challenge you to try to decode it on your own 😉. Try to decode them bit by bit. If you get stuck just Google it. That’s how you learn things.
You can leave a comment too. I am always here to help you.
Congrats you had reached the end 🍻.
Here is the final code for the “script.js” file. Make sure the code you typed up to this point inside the “script.js” is exactly like the following:
// select everything
// select the todo-form
const todoForm = document.querySelector('.todo-form');
// select the input box
const todoInput = document.querySelector('.todo-input');
// select the <ul> with class="todo-items"
const todoItemsList = document.querySelector('.todo-items');// array which stores every todos
let todos = [];// add an eventListener on form, and listen for submit event
todoForm.addEventListener('submit', function(event) {
  // prevent the page from reloading when submitting the form
  event.preventDefault();
  addTodo(todoInput.value); // call addTodo function with input box current value
});// function to add todo
function addTodo(item) {
  // if item is not empty
  if (item !== '') {
    // make a todo object, which has id, name, and completed properties
    const todo = {
      id: Date.now(),
      name: item,
      completed: false
    };// then add it to todos array
    todos.push(todo);
    addToLocalStorage(todos); // then store it in localStorage// finally clear the input box value
    todoInput.value = '';
  }
}// function to render given todos to screen
function renderTodos(todos) {
  // clear everything inside <ul> with class=todo-items
  todoItemsList.innerHTML = '';// run through each item inside todos
  todos.forEach(function(item) {
    // check if the item is completed
    const checked = item.completed ? 'checked': null;// make a <li> element and fill it
    // <li> </li>
    const li = document.createElement('li');
    // <li class="item"> </li>
    li.setAttribute('class', 'item');
    // <li class="item" data-key="20200708"> </li>
    li.setAttribute('data-key', item.id);
    /* <li class="item" data-key="20200708">
          <input type="checkbox" class="checkbox">
          Go to Gym
          <button class="delete-button">X</button>
        </li> */
    // if item is completed, then add a class to <li> called 'checked', which will add line-through style
    if (item.completed === true) {
      li.classList.add('checked');
    }li.innerHTML = `
      <input type="checkbox" class="checkbox" ${checked}>
      ${item.name}
      <button class="delete-button">X</button>
    `;
    // finally add the <li> to the <ul>
    todoItemsList.append(li);
  });}// function to add todos to local storage
function addToLocalStorage(todos) {
  // conver the array to string then store it.
  localStorage.setItem('todos', JSON.stringify(todos));
  // render them to screen
  renderTodos(todos);
}// function helps to get everything from local storage
function getFromLocalStorage() {
  const reference = localStorage.getItem('todos');
  // if reference exists
  if (reference) {
    // converts back to array and store it in todos array
    todos = JSON.parse(reference);
    renderTodos(todos);
  }
}// toggle the value to completed and not completed
function toggle(id) {
  todos.forEach(function(item) {
    // use == not ===, because here types are different. One is number and other is string
    if (item.id == id) {
      // toggle the value
      item.completed = !item.completed;
    }
  });addToLocalStorage(todos);
}// deletes a todo from todos array, then updates localstorage and renders updated list to screen
function deleteTodo(id) {
  // filters out the <li> with the id and updates the todos array
  todos = todos.filter(function(item) {
    // use != not !==, because here types are different. One is number and other is string
    return item.id != id;
  });// update the localStorage
  addToLocalStorage(todos);
}// initially get everything from localStorage
getFromLocalStorage();// after that addEventListener <ul> with class=todoItems. Because we need to listen for click event in all delete-button and checkbox
todoItemsList.addEventListener('click', function(event) {
  // check if the event is on checkbox
  if (event.target.type === 'checkbox') {
    // toggle the state
    toggle(event.target.parentElement.getAttribute('data-key'));
  }// check if that is a delete-button
  if (event.target.classList.contains('delete-button')) {
    // get id from data-key attribute's value of parent <li> where the delete-button is present
    deleteTodo(event.target.parentElement.getAttribute('data-key'));
  }
});
Feel free to hack the thing you just made!
Wrapping Up
I hope you have enjoyed this tutorial. If you have any doubts, then please comment them below.
And more importantly, if you enjoyed this tutorial, then please hit that clap button as much as you like.
Thank you 😇.
